Quick links
What is GitHub
GitHub allows you to save files and folders online and it lets you track changes made by one or many people editing that information. It uses git, which is a version control system that saves who changed what and when, and it let’s you move “back” to previous versions and “roll back time” when needed.
How does GitHub work
Github hosts a Repository (a set of files and folders and a history of changes) in the cloud. You can edit on the cloud directly (using a code editor in a browser) or you can download your code, work in your computer and then re-upload to keep the cloud version in sync. Here are the steps to work with Github.
Get a GitHub account
Every student in class needs to have their own GitHub account. It is free. When opening your account, do the best you can to use a name similar to your username at Smith. For example, if my name is Pablo Frank Bolton, I would love to use “pfrank”. If that is taken, I could use “pfrankbolton” or “pfrank80” or something lke that.
You don’t strictly need an account to use git, but it makes things easier for novices.
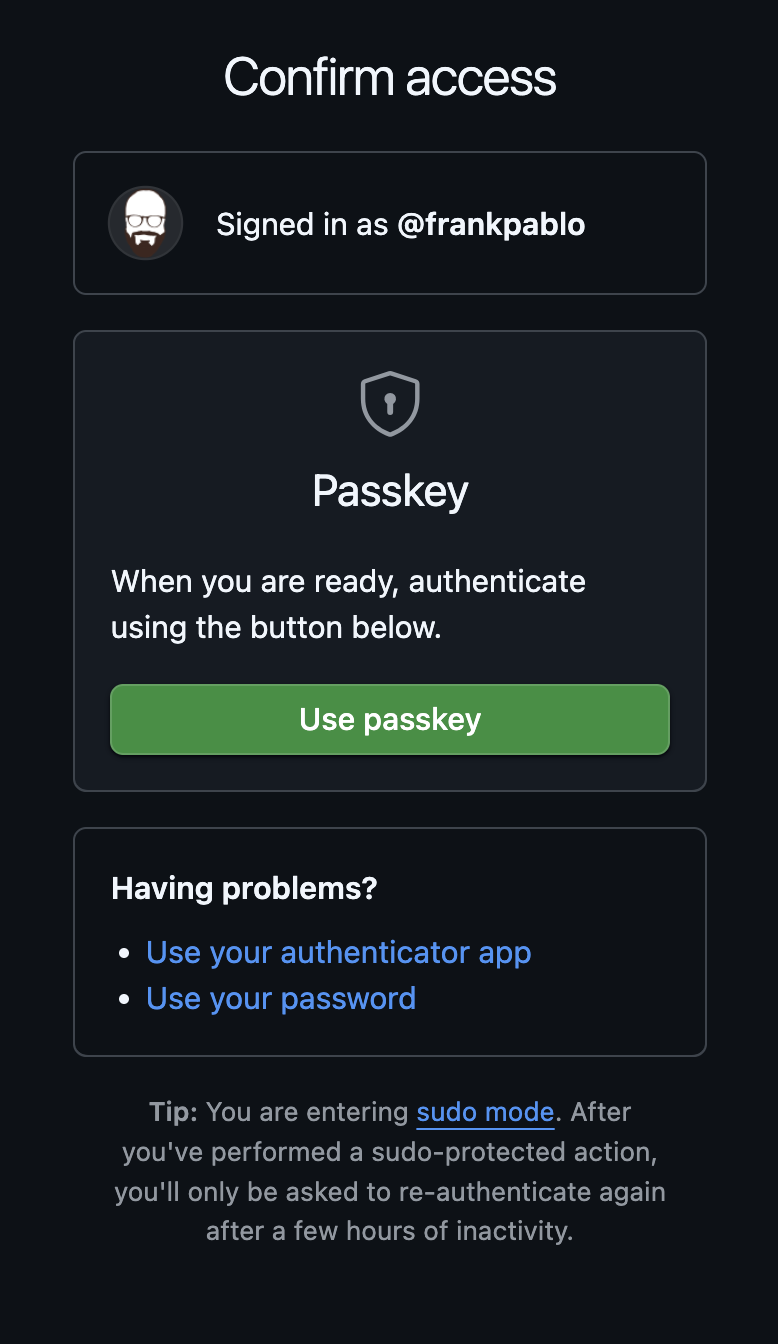
Use this link to signup to GitHub
Repositories
GitHub saves projects in repositories. We call each a “repo”.
A repo saved online is called a “remote repo”, and a copy of that remote on your local computer is simply called your “local repo”.
There are many ways to create a repo and use it, but in this class, this is what we’ll do:
- Your instructor will distribute a link that let’s you copy a template repo so you get your own. This is called “forking a repo”.
- Once you fork a repo, two things will happen: a. A repo under your account will be created with an exact copy of the template repo. We’ll call this your “remote repo” since it is stored online. b. If the instructor set up a “coding environment” for you, your remote repo will be opened in a “local” coding environment (more on this later). In this class, we’ll use GitHub codespaces to edit your repos.
- You then work on your assignment by editing the desired python files, checking syntax, and testing, and when ready, you…
- Save “waypoints” of your progress.
- When you submit the last “waypoint” you are done and your repo is already submitted. The instructor can see its last submission and grade it.
How Do You save “Waypoints”?
When using git, every repo can have tracking of changes so that every little thing could be “undone” if necessary. The steps to save your work are:
- Pull: Before making ANY changes, always pull from the repo so you have the most updated version of the repo contents.
- Edit: Make some edits and check your code runs (has correct syntax) even if it does not do everything you need it to do yet.
- Stage: You must then stage the changes. This means that you have git add the current changes to the list of things you want to save on your waypoint.
- Repeat: You could then do more edits (go to 2) but then you’d have to stage those changes as well. Once you feel you’ve made and staged enough changes so that you want to save your current “waypoint”, you are ready to commit.
- Prepare a commit message: Before fully committing, prepare a commit message. It is very important that you add a commit message before committing. Usually, these are short: “added the foo(num) function” or “fixed the bug in bar()”
- Commit: committing is saving a group of edits that constitute the changes you want recorded. The difference between the current state of the project and the previous commit will constitute the changes made if you perform an “undo”, in case you need to roll back. Note that a commit is not an upload. A commit is still only saved on your local repo and the changes are not yet submitted “online”.
- Repeat: You can do steps 2-6 until you are ready to upload or submit the accumulated changes stored in the sequence of commits.
- Push: pushing, in git, means uploading all your commits to the repo that is stored remotely. In Codespaces or VSCode, an option exists for performing a “Commit and Sync”. This really only means that, before performing a Push, a Pull is done. However, if your changes conflict with changes made by someone else, then a conflict may arise that needs to be resolved (more on this later).
Installing git
git is the program that tracks changes and that knows how to talk to the remote repository in GitHub. Here is how you install it:
First, go to the section for your laptop (MAC or Windows) and then follow the instructions.
Installing git on a Mac
- Open your Terminal application.
- Run the following command:
git --version - If Git is installed, you’re done. If it’s not already installed, a dialog box will appear prompting you to install the Xcode Command Line Tools.
- Click “Install” and follow the on-screen instructions. This bundles Git along with other developer tools.
- ONLY If this step didn’t work, do the following:
- we’ll install
brewand use it to install git: go to [this page](https://brew.sh/, copy the command shown below, and run in Terminal./bin/bash -c "$(curl -fsSL https://raw.githubusercontent.com/Homebrew/install/HEAD/install.sh)" - Now follow the instructions on the terminal
- When
brewis done installing, run the following command:brew install git
- we’ll install
If you have trouble with any of these steps, ask for help.
Installing git on a Win
- Go to this cite: https://git-scm.com/downloads/win
- Click on the link that reads: “Click here to download” and download the .exe for Git
- Double click on it.
- You are going to follow the on-screen instructions and accept all default settings except one. For the “Select default Editor”, click on the drop-down and select “Sublime”. Everything else should be the recommended or default settings.
If you have trouble with any of these steps, ask for help.
Configuring git for local use (Mac and Win)
- After you install git, you need to set your name lastname and email.
- Run the following command but substitute First Last for you first and last names (include the quotes):
git config --global user.name "First Last"Note that the “user.name” part is exactly that. The only thing you change is the “First Last” part. - In my case, the command looks like this:
git config --global user.name "Pablo Frank" - Now, to set your email, run the following command but substitute email for your smith email (or the email you set up in Github)
git config --global user.email <username>@<domain.edu> - In my case, the command looks like this:
git config --global user.email pfrank@smith.eduNow you should be all set with git.
GitHub CLI
GitHub CLI is the program we will use to help us “download” repositories from GitHub (in the cloud) don to our laptops.
Please follow the instructions for your operating system:
Installing GitHub CLI for WINDOWS:
Happily for Windows users, installing GitHub CLI can be done with an install wizard:
-
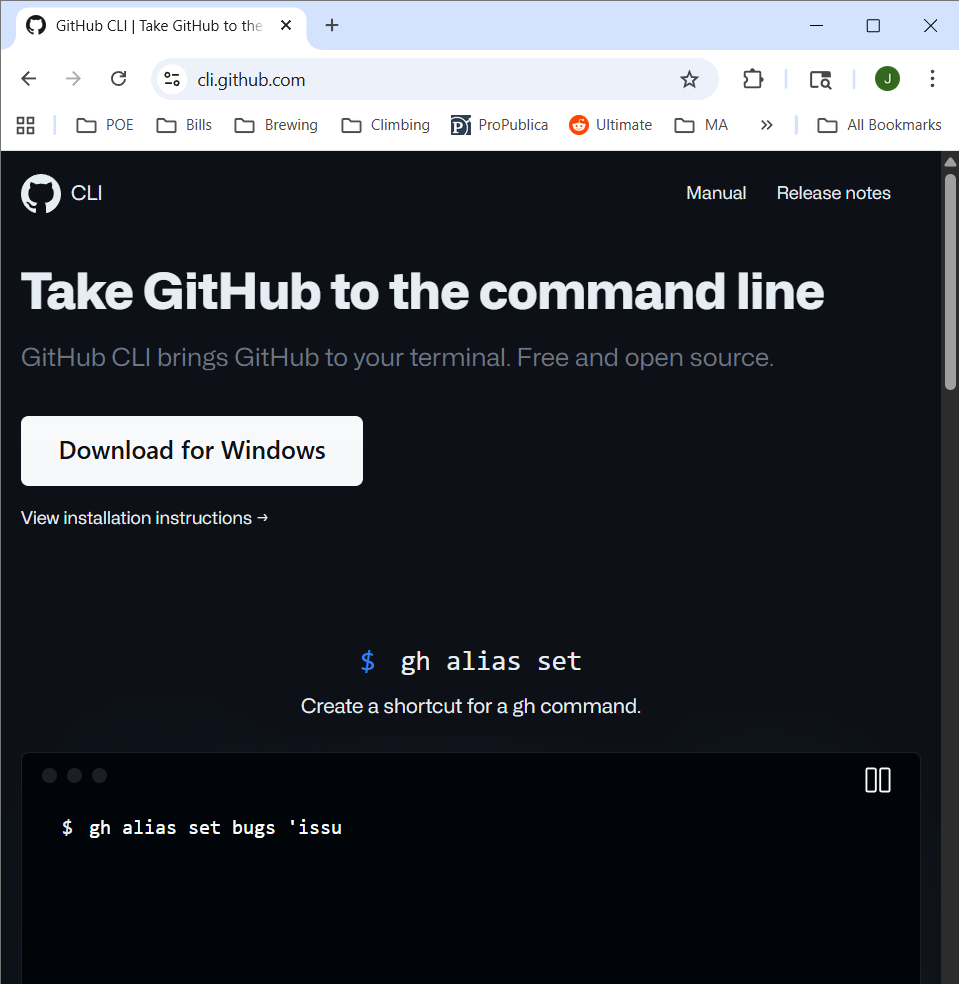
Go to this page: https://cli.github.com/. You should see this:
- Press the “Download for Windows” button.
-
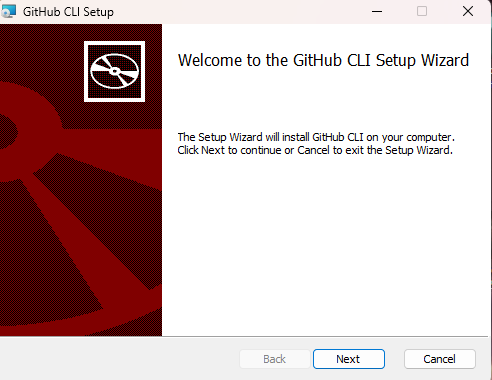
Double click on the downloaded installer. This is what you’ll see:
-
After you click Next. This is what you’ll see:
-
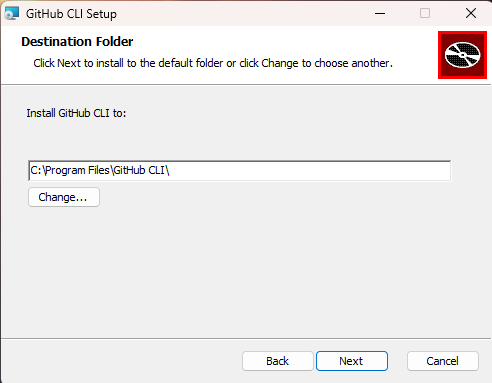
To confirm the install location, click Next. This is what you’ll see:
-
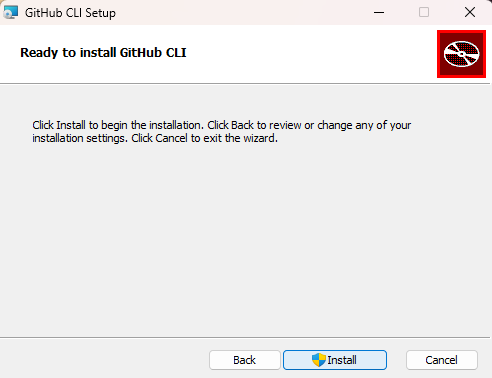
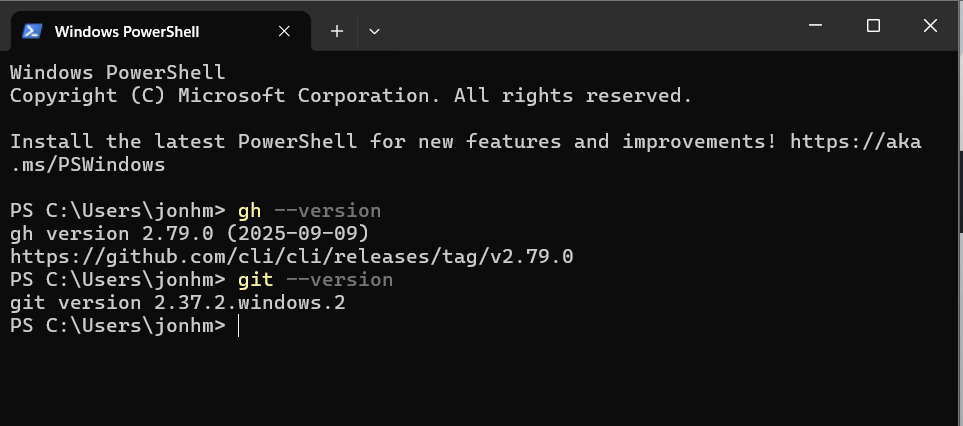
Click install. After it is done installing, Open a PowerShell and run the following command:
gh --versionYou should see something like this:
Installing GitHub CLI for MAC:
- Install a help program called homebrew:
- Open your terminal and run the following command (copy-paste it):
/bin/bash -c "$(curl -fsSL https://raw.githubusercontent.com/Homebrew/install/HEAD/install.sh)" - When it finishes, close the terminal and open it again.
- Open your terminal and run the following command (copy-paste it):
- install the GitHub CLI program:
- In the Terminal, run the following command:
brew install gh - Wait until it ends and then run the following one:
brew upgrade gh
- In the Terminal, run the following command:
Setting up GitHub CLI (Mac and Win)
- Now We’ll connect to GitHub:
- run the following command in your Terminal (Mac) or PowerShell (Win):
gh auth loginYou will see the following appear on your Terminal/PowerShell:

- You then need to confirm HTTPS as the preferred method (use your arrows to select HTTPS and hit return or enter)

- You will then confirm you want to authenticate git with GitHub credentials (type
Yand hit return / enter):

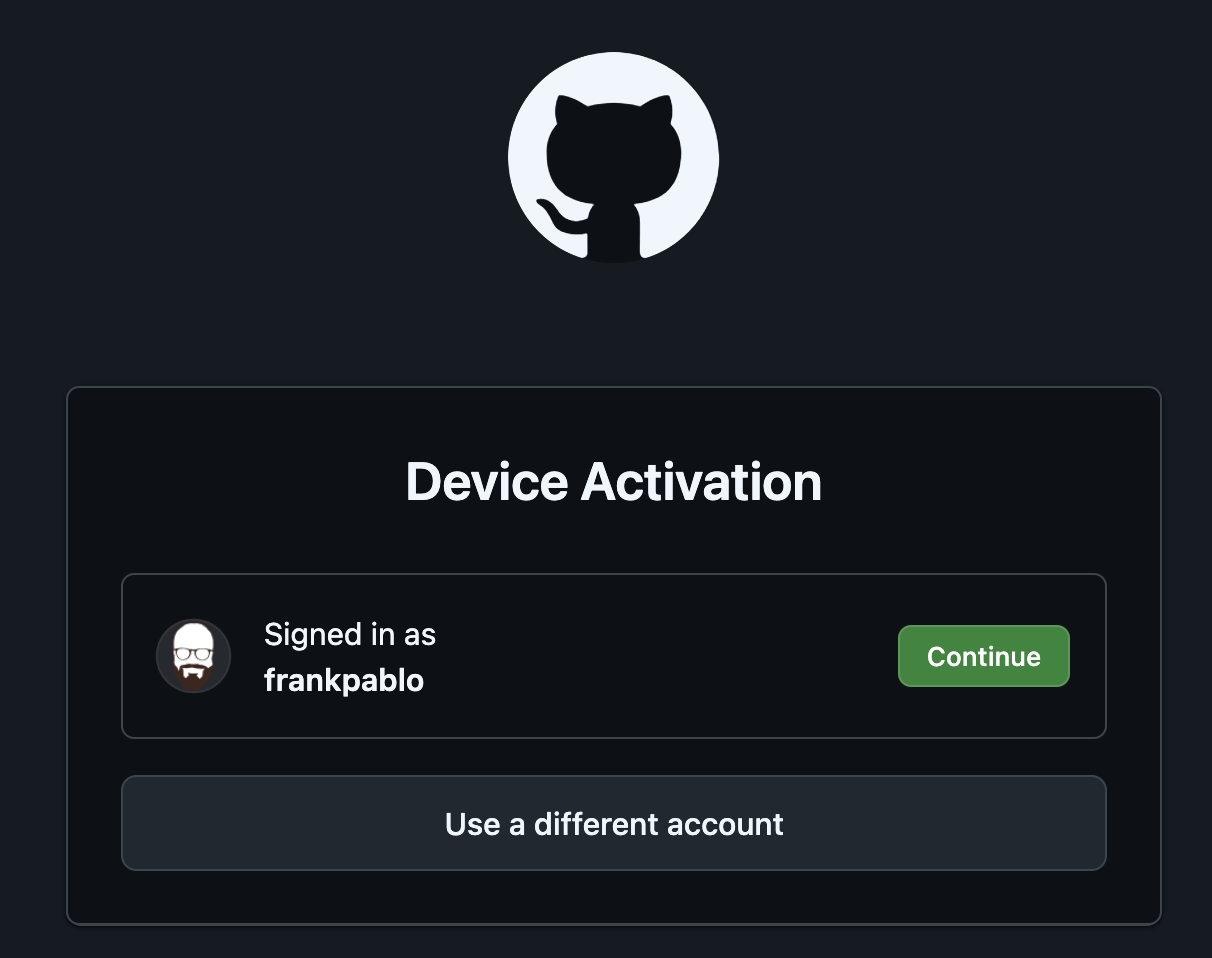
- You will then pick which method to use to authenticate GitHub credentials. You’ll pick “Login with a web browser” and hit return.

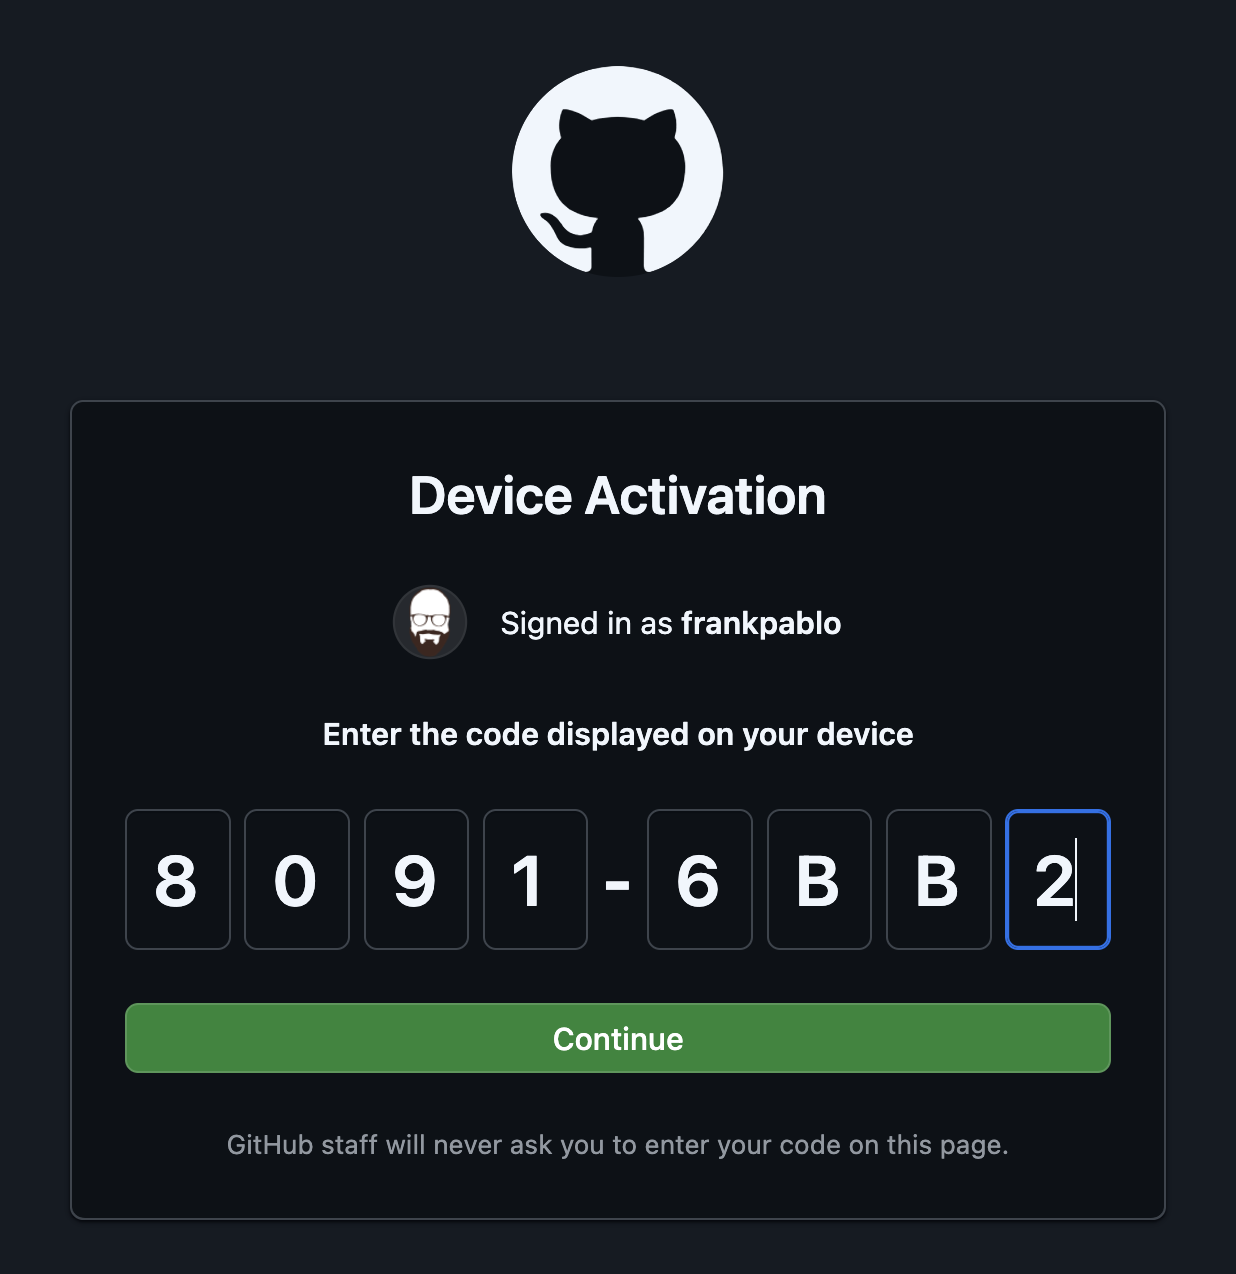
- You will then copy the 6-symbol code that appears on the terminal (highlight it and copy or write it down).

- Then, hit return / enter and a browser will open up. Confirm you want this device used to sign in to GitHub:
- Then, a window will open up, asking you to enter the code. You can paste it or type it one by one.
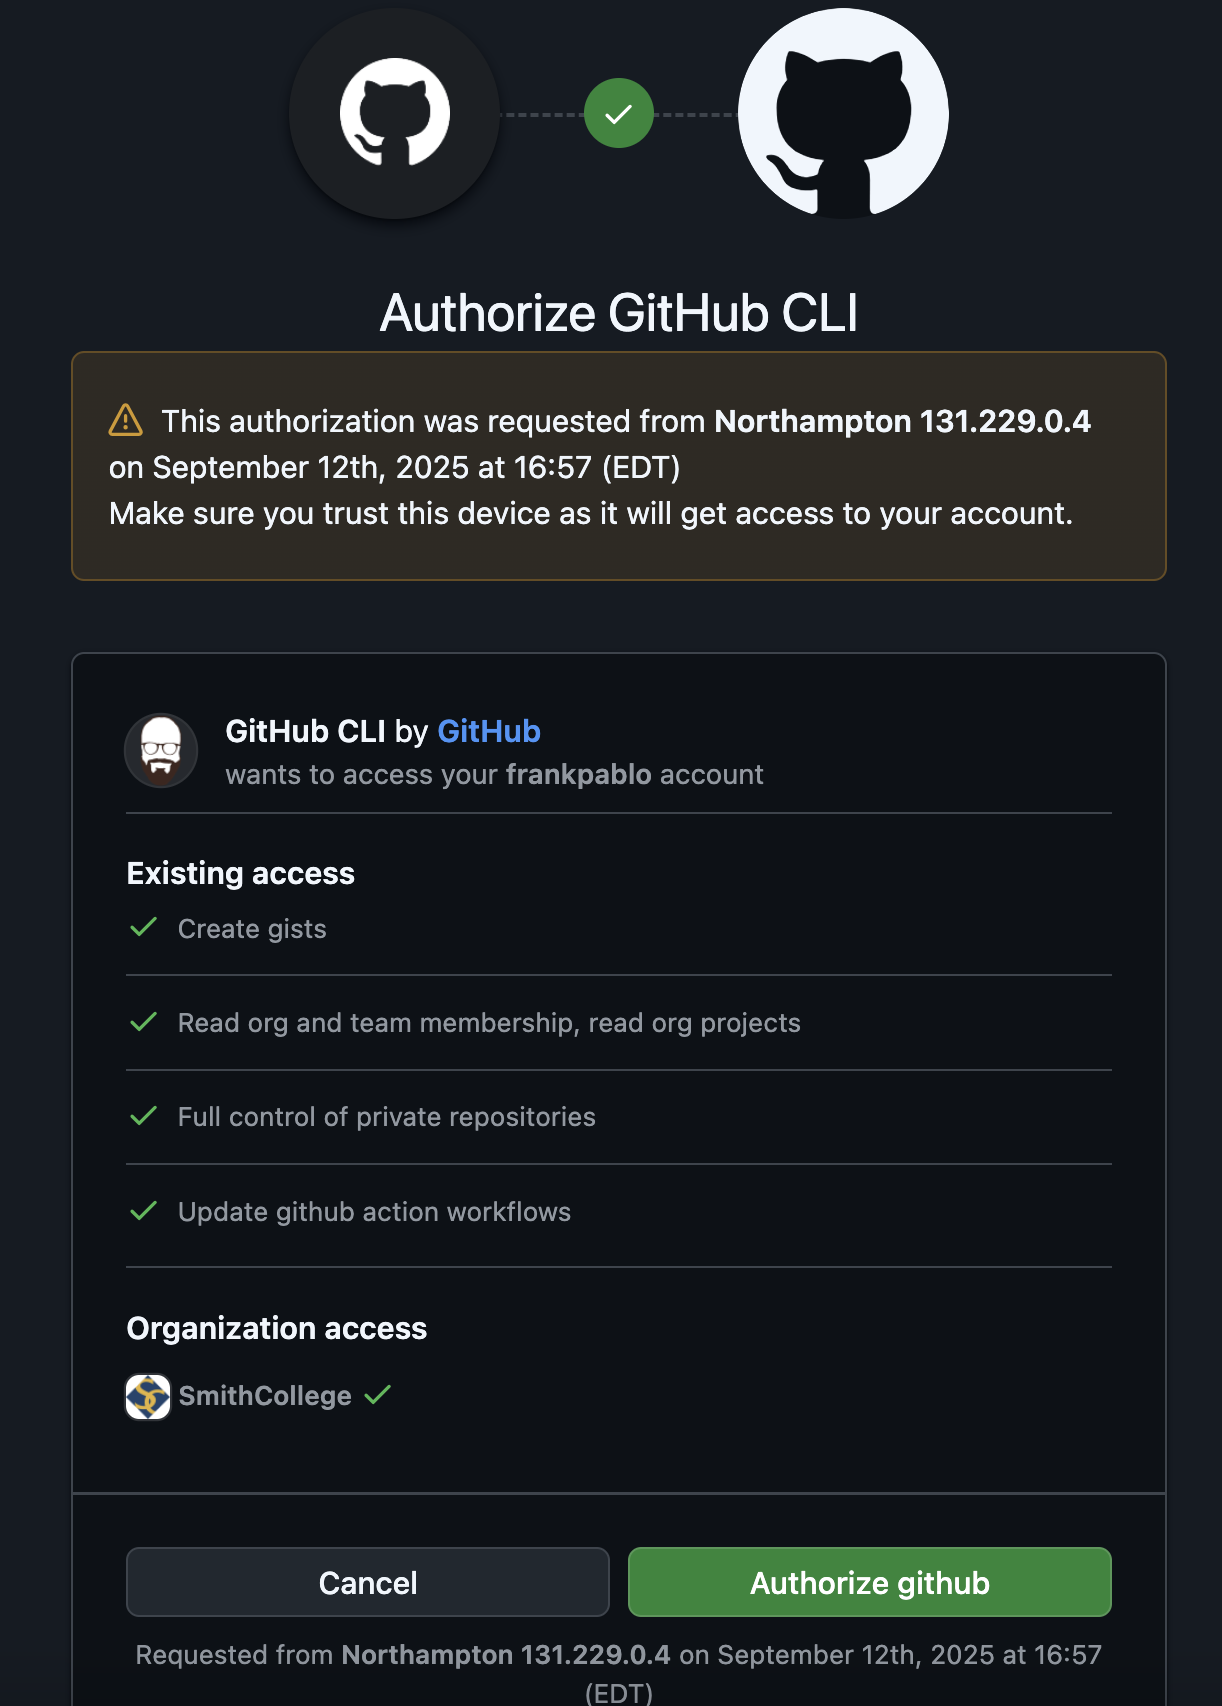
- Then, Authorize GitHub CLI to talk to GitHub:
- Now, sign in to GitHub using your credentials
- Then you’re all done:
- run the following command in your Terminal (Mac) or PowerShell (Win):
Working with git:
If you forgot to set Sublime as your editor
In Mac, you can tell git to call sublime like this:
git config --global core.editor "subl -n -w"
(if this does not work, ask for Instructor/Tutor help. They need to male sure the command subl is in the PATH)
In Windows, you can tell git to call sublime like this:
First, check your Sublime is installed at 'c:/Program Files/Sublime Text 3/subl.exe' -w
If it isn’t, find where it is installed and replace that location as the address section in the instruction shown bellow:
git config --global core.editor "'c:/Program Files/Sublime Text 3/subl.exe' -w"
(if this does not work, ask for Instructor/Tutor help. They need to male sure the command subl is in the PATH).
First time you want to download the materials:
Fork and Clone
The first time you accept and create a repository, you need to name your team or join an existing team. Make sure you verify before you do this.
Once you join a team, a repository will be forked for you.
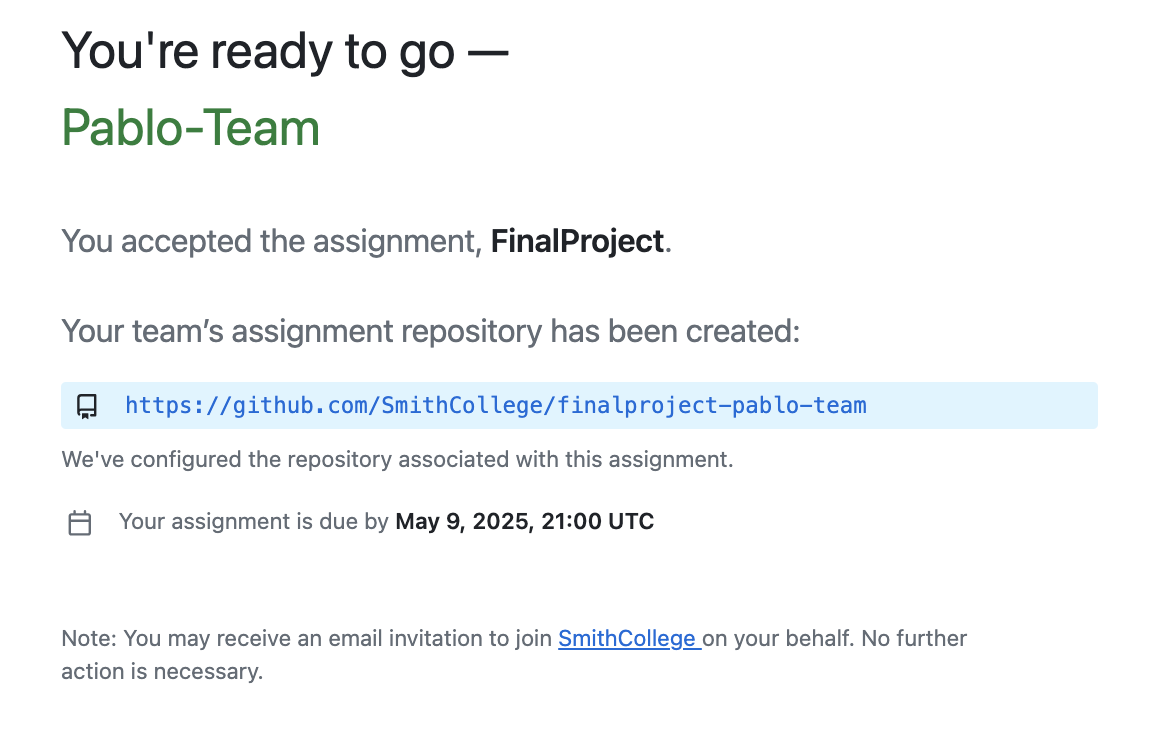
If you click on that link, or search it in your Github account, you will find the following information in your repository:
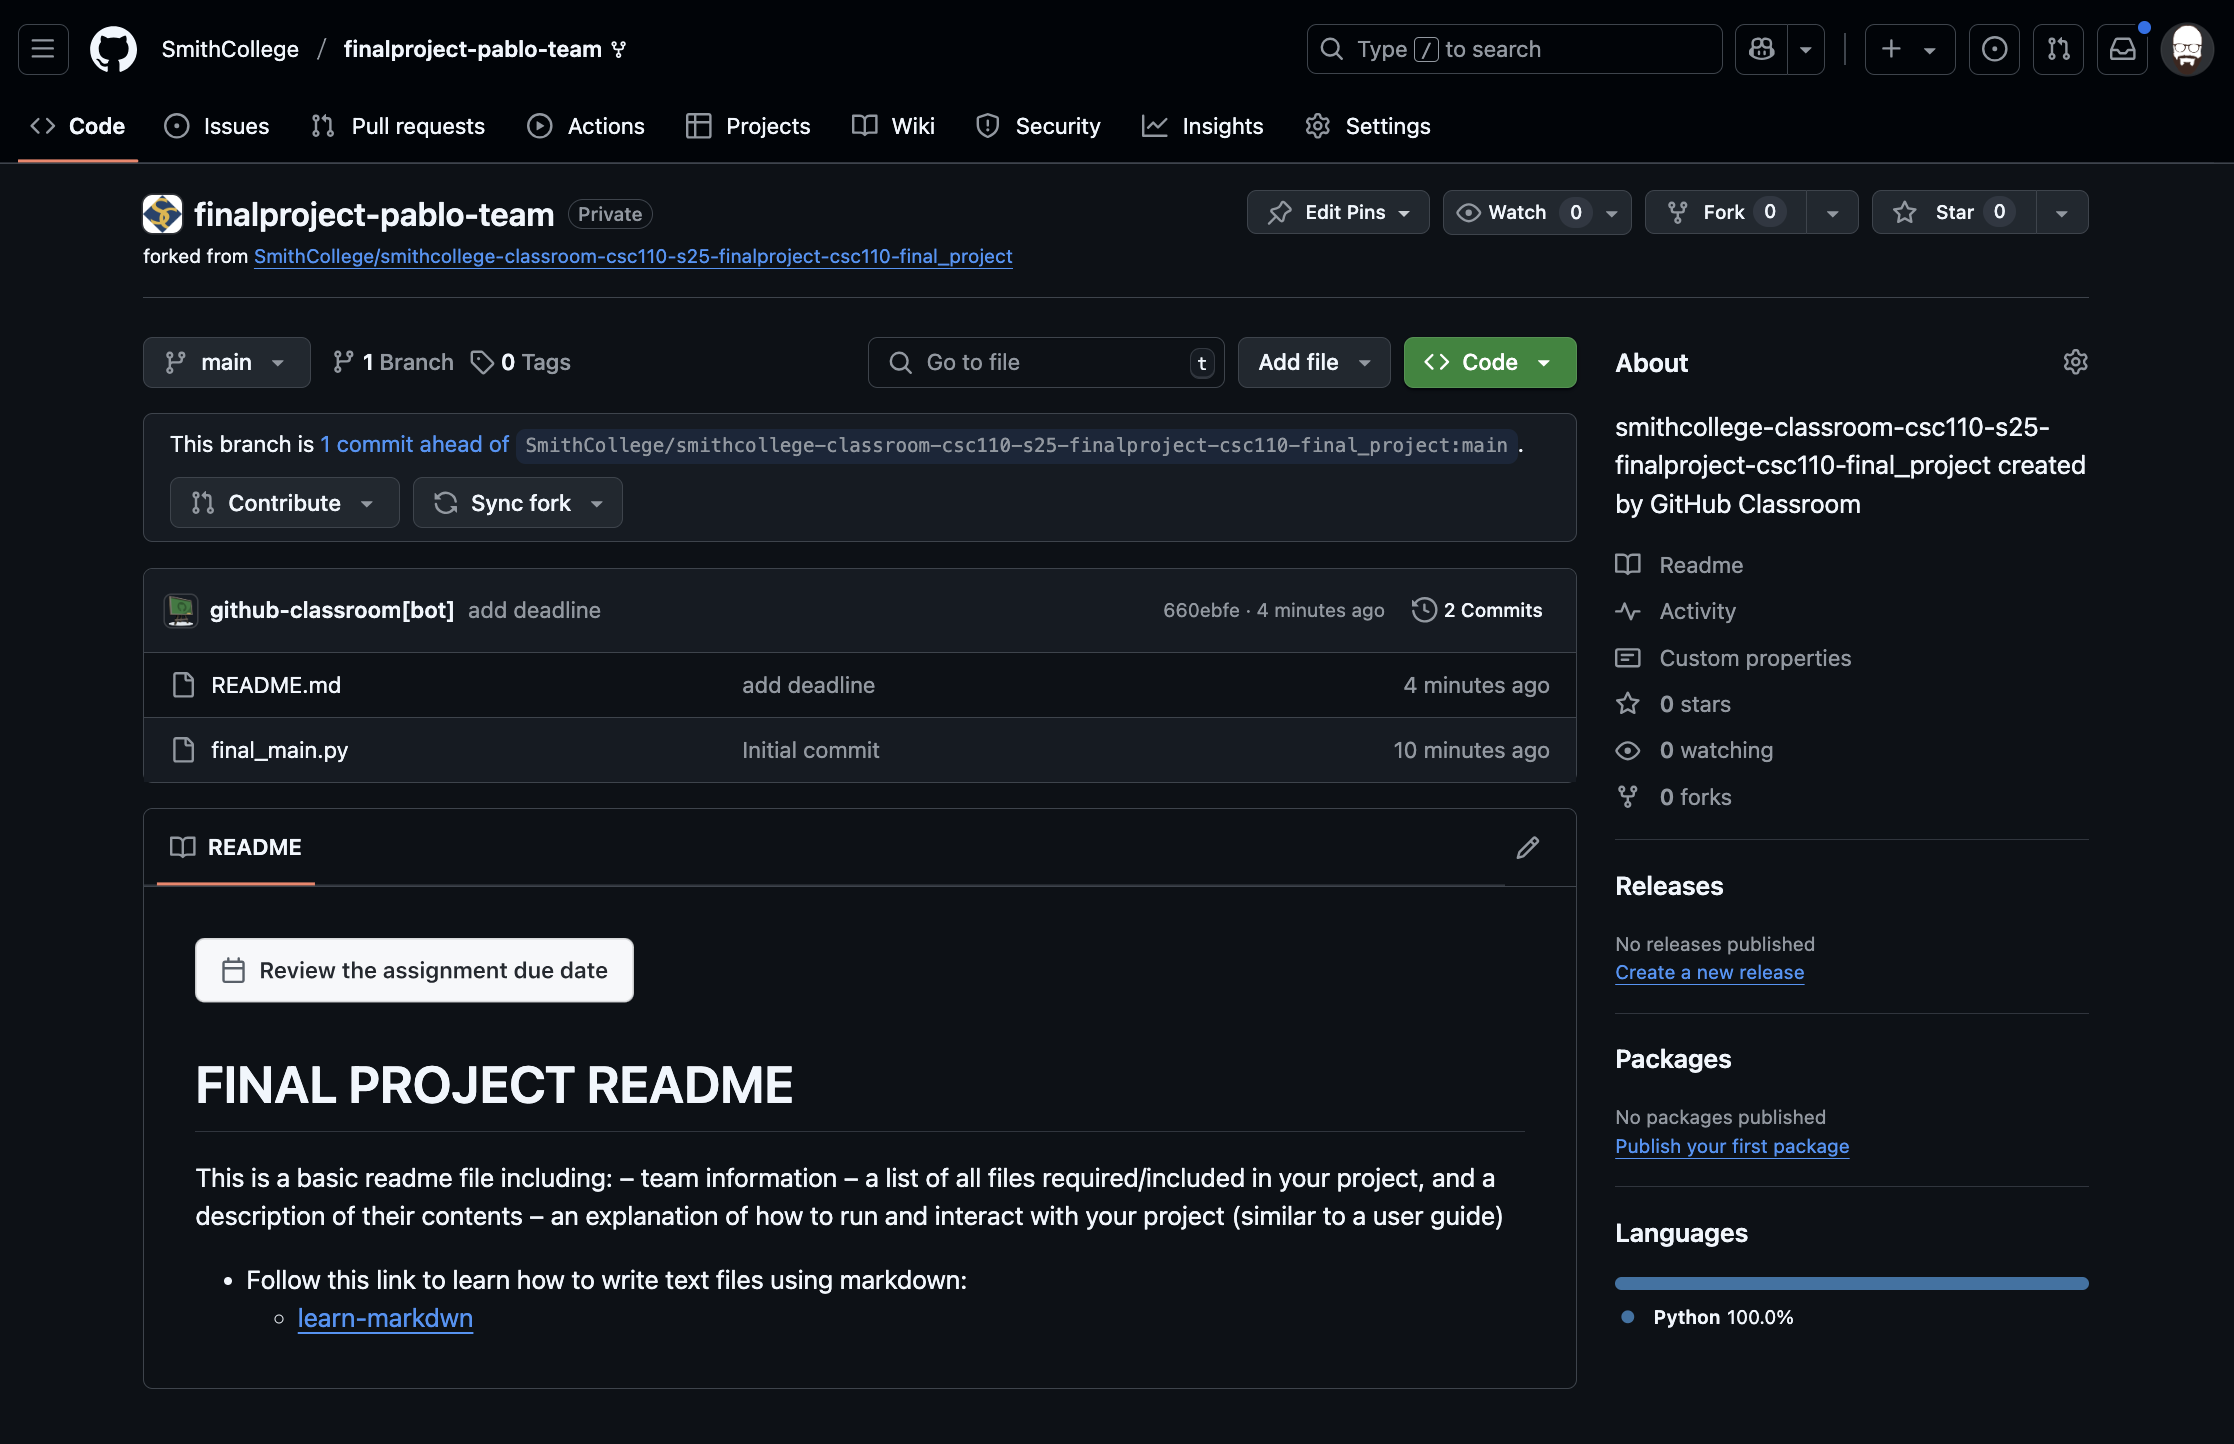
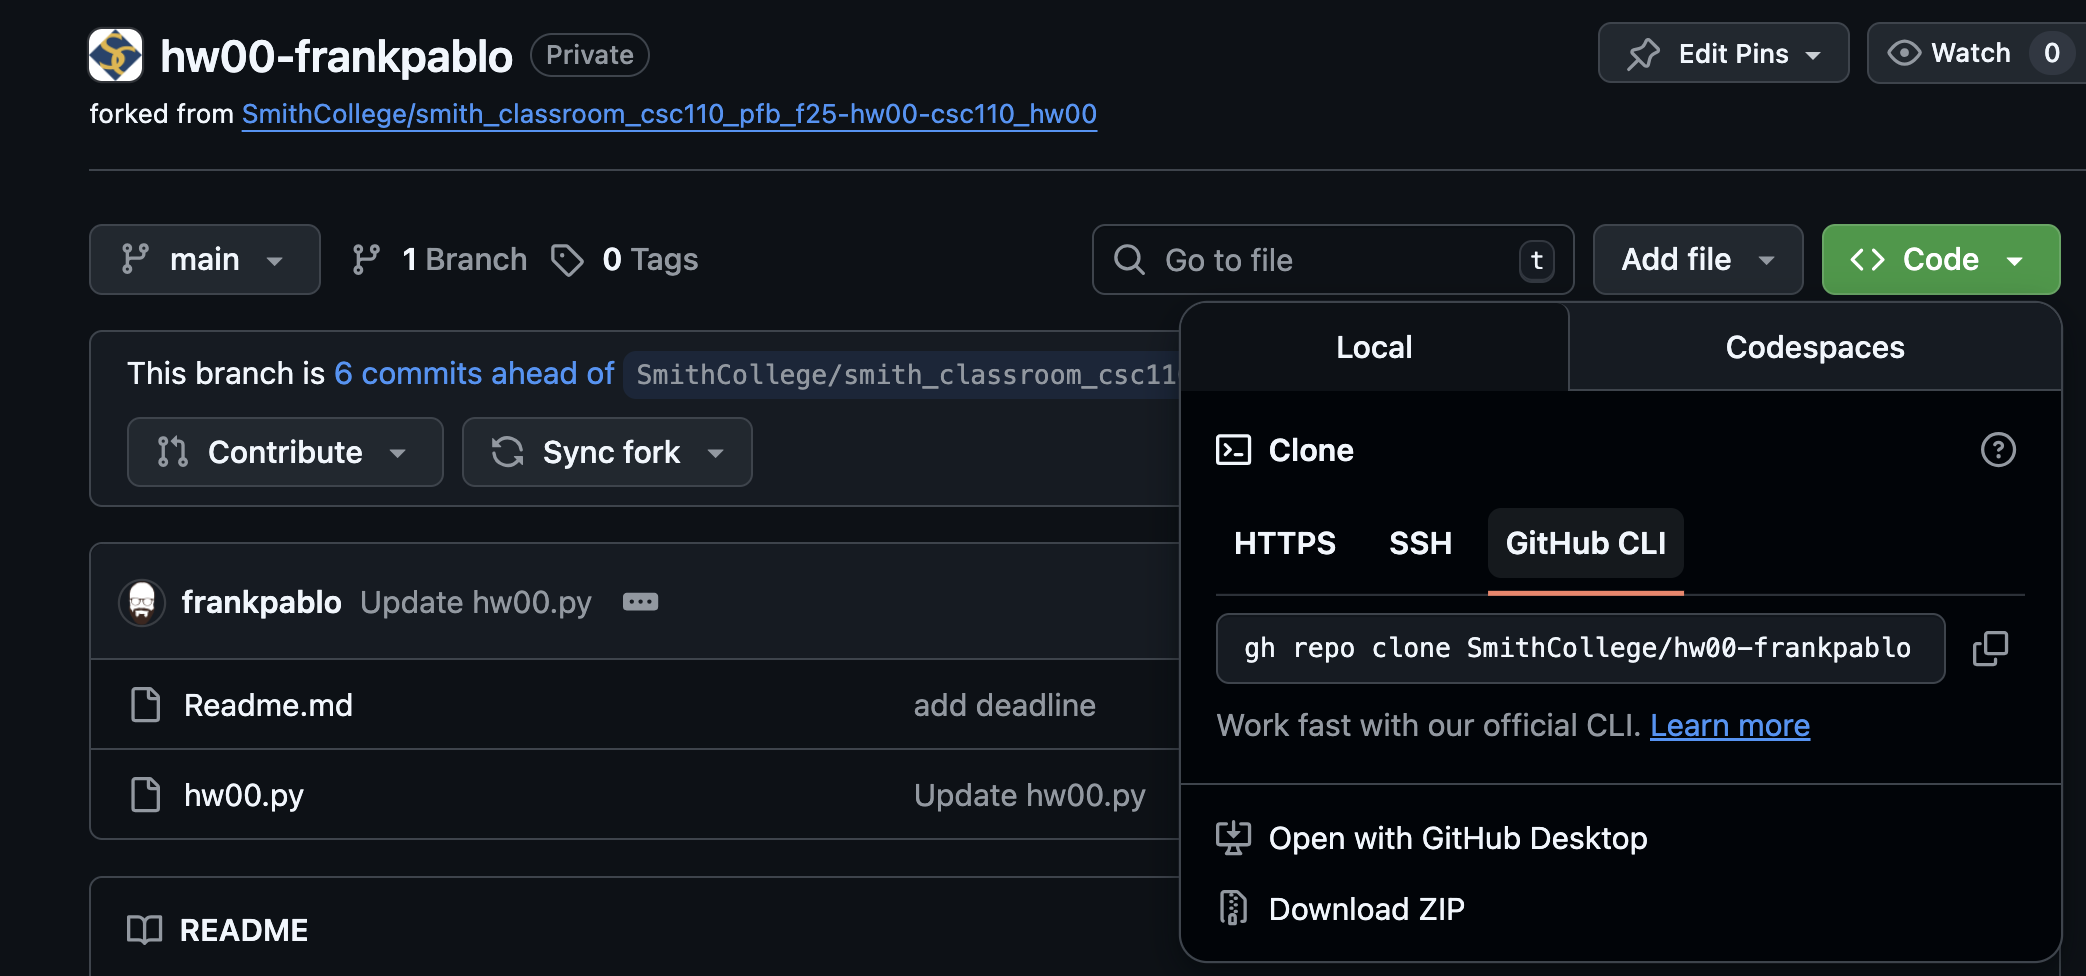
The first task is to clone (or download) the github cloud repository (remote repo) to your computer (local repo). You first need to copy the remote repo address, which is located under the <>Code button and local tab, and the “GitHub CLI subtab”:
This is the instruction we’ll use to clone (or download) the remote repo to our local machine.
Here is what you need to do:
- On Mac, open the Terminal; on Windows open PowerShell. Now navigate to your csc110 folder.
- On Mac:
cd Documents/csc110 - On Win: cd
.\Documents\csc110\ - Note: Remember you can autocomplete the commands by using “Tab”
- On Mac:
- If what you are downloading is a homework, then we should make a homework subfolder here (don’t do this if you already have a “homework” folder).
- We first check the contents of the csc110 folder. Use the
lscommand. - If you don;t have a homework folder, create it with this command:
mkdir homework - Now, change directory into this new folder using:
cd homework.
- We first check the contents of the csc110 folder. Use the
- Now we’re ready to clone (download the repo):
-
If you haven’t already, copy the clone instruction inside the Code<> area under the local tab and GitHub CLI subtab. For me it is something like this:
gh repo clone SmithCollege/hw00-frankpablo- Note that it will be different for you!!
- Now paste this command on the Terminal (or Powershell).
- Now, you can hit return/enter and the repository will be downloaded.
-
- To verify you now have the local repo, please use the
lscommand. - Now
cdinto your local repo.
Working with git
The following steps are used to work with a git repository:
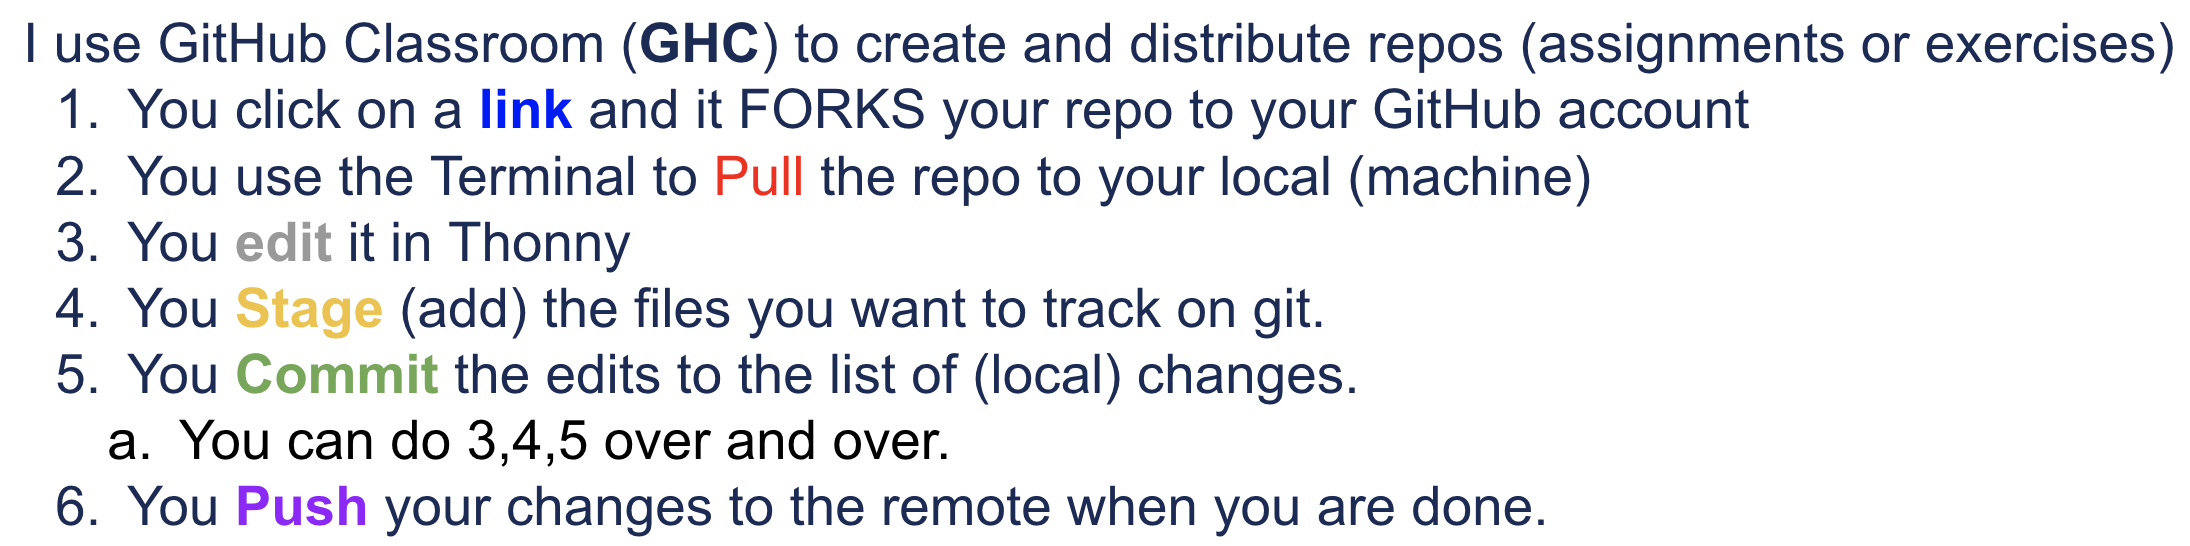
This image corresponds to the steps shown above.
git commands
The following commands should be run in the terminal, while focused on (inside of) the local repository directory you cloned:
In the following examples, I will at as if I just modified hw01.py by adding two lines (don’t worry if you have not reached hw01 yet):
    x = 27
    print("Part 1: x =",x)
Checking status
First of all, I want to see what the git program sees after the modification of a file, so I run the command:
git status
In this example, the following is returned:
pfrank@Pablos-MBP hw01-frankpablo % git status
On branch main
Your branch is up to date with 'origin/main'.

Changes not staged for commit:
  (use "git add <file>..." to update what will be committed)
  (use "git restore <file>..." to discard changes in working directory)
        modified:   hw01.py

Untracked files:
  (use "git add <file>..." to include in what will be committed)
        __pycache__/

no changes added to commit (use "git add" and/or "git commit -a")
pfrank@Pablos-MBP hw01-frankpablo %
Note that after every compilation, the computer adds an annoying little extra folder called __pycache__. This is like “cookies” in browsers. It helps kep track of compilation information to speed things up.
We don’t need to track some files, so we can actually tell git to ignore them. Here is how:
Adding a gitignore
You can create a file called .gitignore inside the local repo. It starts with a dot and has no extension. These files are “hidden files” that contain configuration information.
The easiest way to create a .gitignore is with Sublime. Just open a new file and add the following inside:
Then save the file as `.gitignore`.
If you complete this on SUblime, just skip to the next section. However, you can also do this using the in-Terminal editor.

You can create it in the local repo using sublime or other text editors, or you can use the `touch` command on the terminal, which should allow you to simply create the file like this:
touch .gitignore
To add info to it, you can open it (sublime is fine) and add, in each line, what you want ignored.
You can also edit directly on the terminal. There are different Terminal editors, but one of the simplest are Nano or Pico.
Here are all the [instructions](https://www.nano-editor.org/dist/latest/cheatsheet.html)
The important instructions are:
* If you see “^X” that means `Ctrl + x`
* The menu at the bottom reminds you of how to do things
* `Ctrl + o`: to save (press return or enter after you do)
* `Ctrl + x`: to exit (you might need to confirm saving changes)
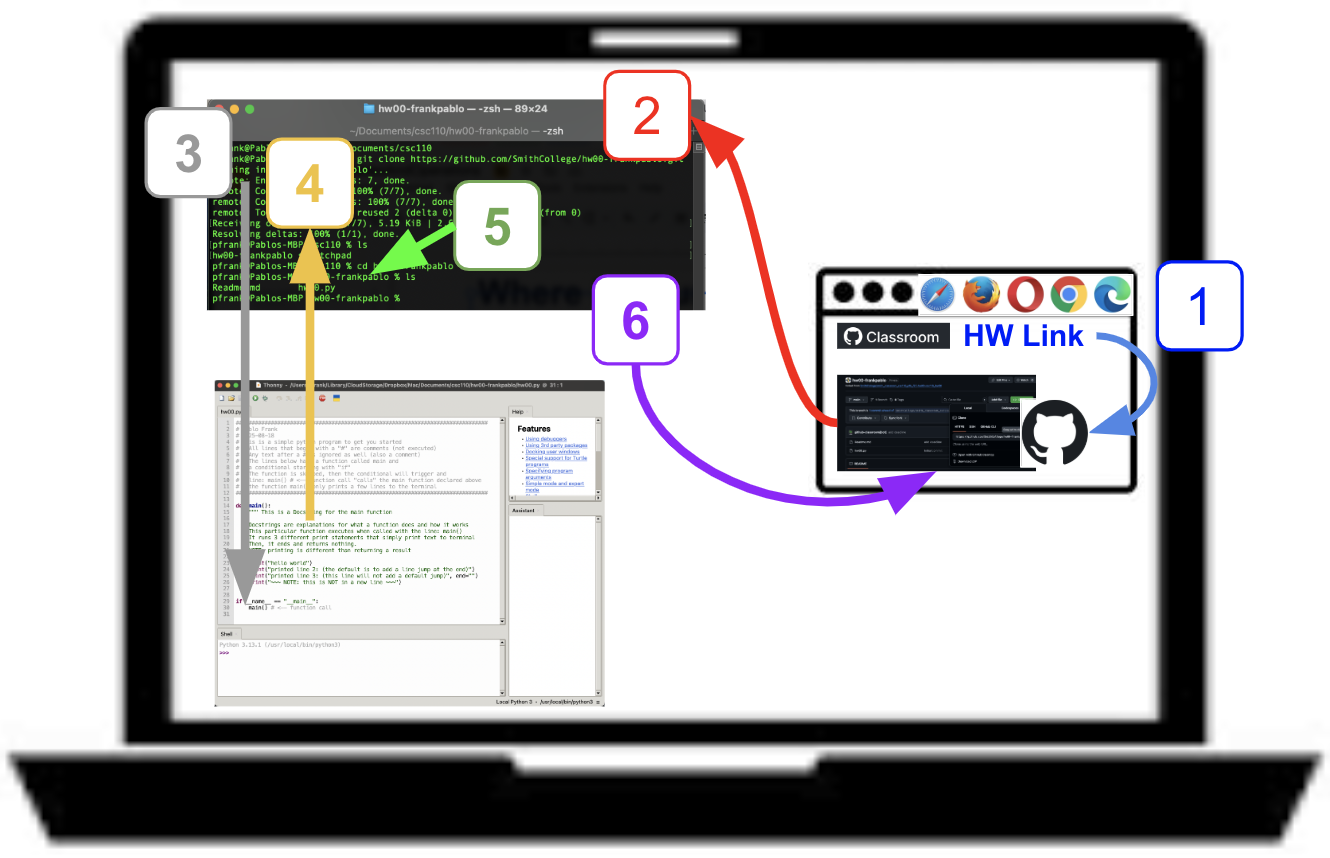
So now, in our example, let's edit the file called `.gitignore`:
I will edit this using the pico editor, like this:
pico .gitignore
It opens the editor, and I simply add the line `__pycache__/` (with the forward slash on Mac AND Win).
{: width="100%"}
### Fetching (Checking for changes on the remote)
Sometimes, people work on multiple devices or in teams, so it is good practice to check if the remote has been changed, and if so, pull the remote BEFORE making changes to it.
First, to check what is in it, we "fetch" the changes like this:
git fetch
You can then run `git status` again to displays any changes:

If there are changes on the remote, status will say something like this:
Your branch is behind ‘origin/main’ by X commits, and can be fast-forwarded. (use “git pull” to update your local branch)
In this case, you should get the latest version of the remote.
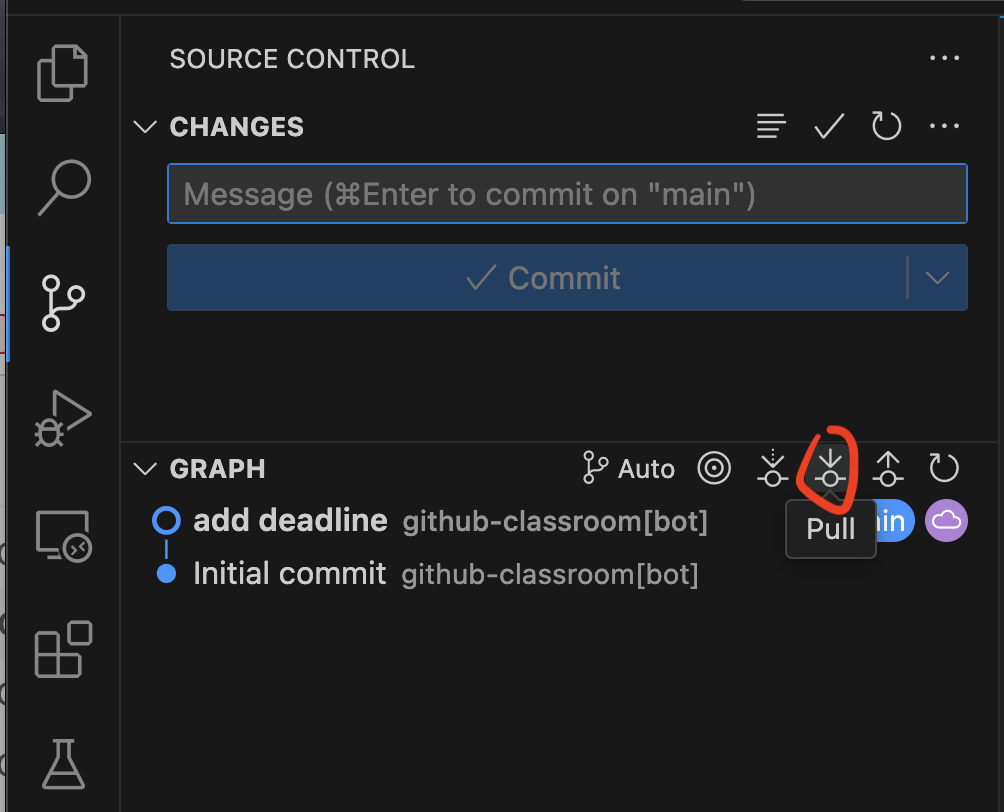
### Pulling
Pulling means downloading. You do this when you are confident that these changes are good. In more advanced workflows, one can work on separate versions called branches that one later merges... but that is beyond the scope of this class.
Here is how you pull your remote repo changes:
git pull
When executed, it reports the changes done to your local repo (to catch it up).
You might run into trouble here if you made local changes before pulling. In that case, go to your instructor (the only thing we'll do is to save the changes separately, pull, then try to do the local changes).
### Editing your files
**Before you edit, you should fetch and pull any changes to the remote.**
You can edit your files on Sublime, Thonny, or directly on the terminal.
Note that when you compile, the `__pycache__/` directory is created and that technically constitutes a modification. If you added it to the `.gitignore` file, it should not be added to the changes.
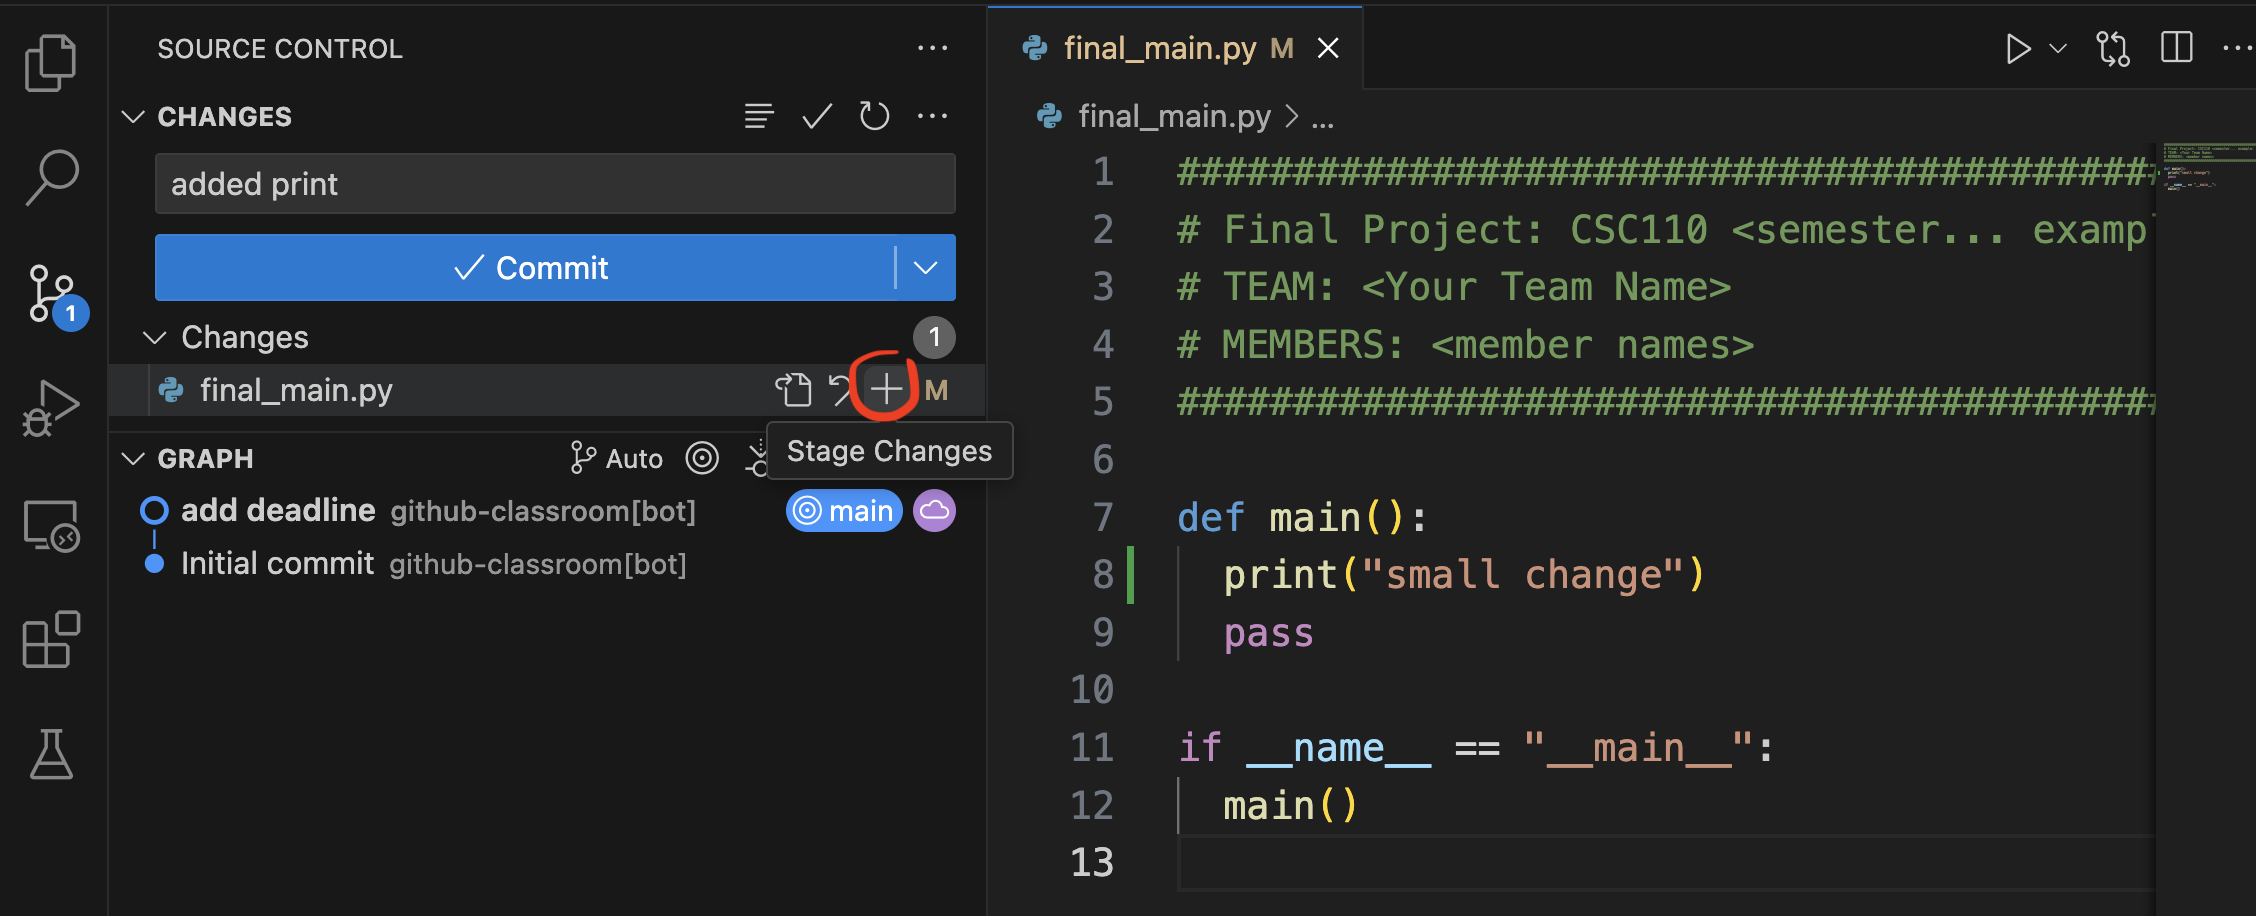
### Staging, AKA: Adding (specific)
To add a single, specific newly modified file called `modified.py` to tracking, you would run the following command:
git add modified.py
### Staging, AKA: Adding (all)

To add all newly modified files to tracking in one go, you would run the following command:
git add .
Note: notice the dot!
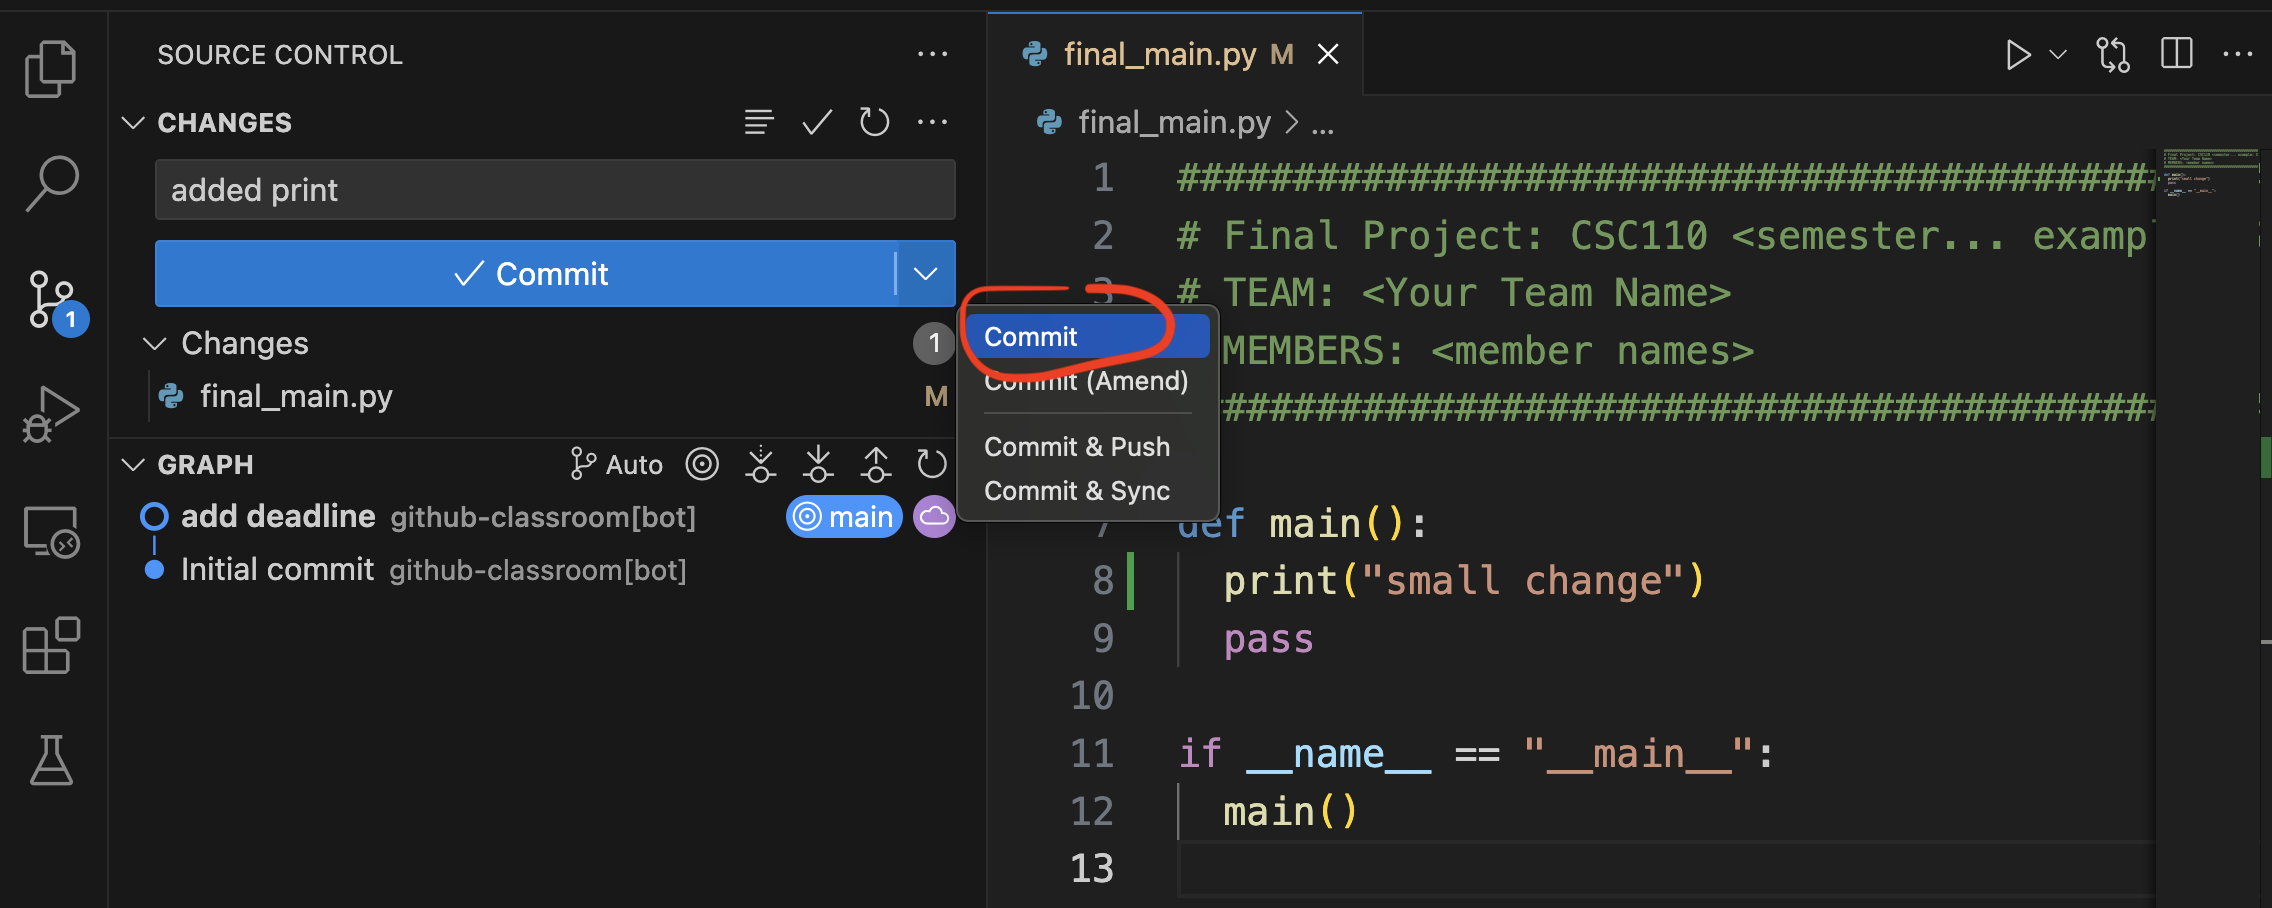
### Committing (all)
To commit all newly modified files to the current "set of modifications", you would run the following command:
git commit -m “short informative message of <80 characters”
Note: the `-m` flag allows you to put the message inline. It is important to add the double quotes.
### What if I forgot the `m` flag?
If you just do `git commit`, an editor window will open on the terminal and (probably) use the program called "nano" or "pico" to edit it. If this happens, simply type, at the top, the message you want to write (no need for double quotes).
**Note:** one can commit many times, and in fact, it is a good idea to do so. A standard approach is to edit and run the program until it compiles and does what we want (maybe it passes some new tests). Then we: add (stage) and commit (with a message indicating what feature was added). You can then repeat for the next feature and so on.
If you want to "save your progress", even if you are not done, that is when you push.
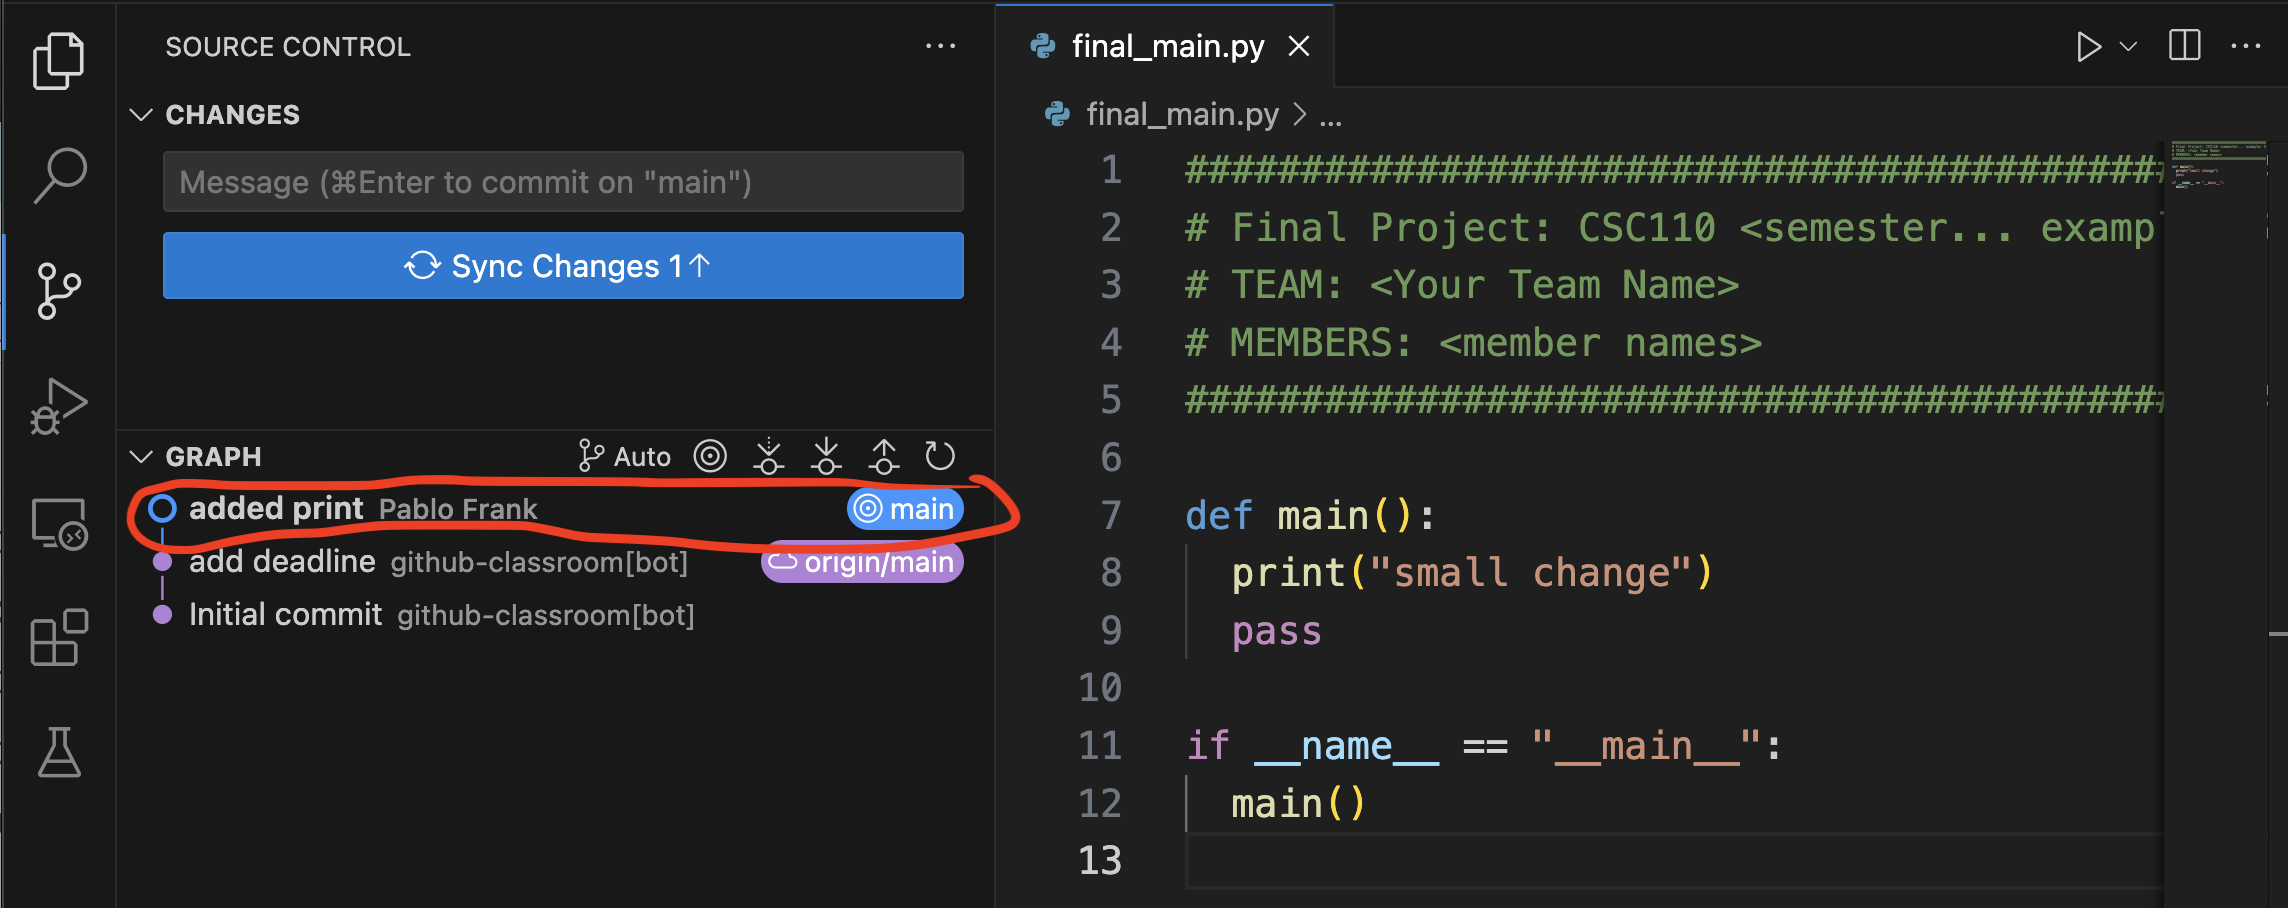
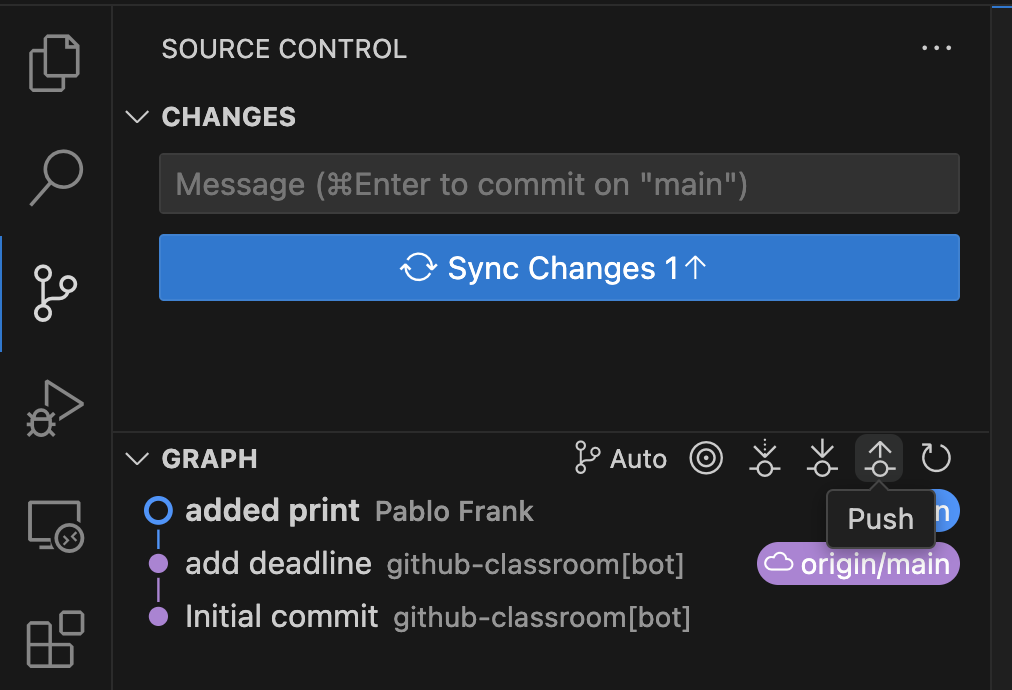
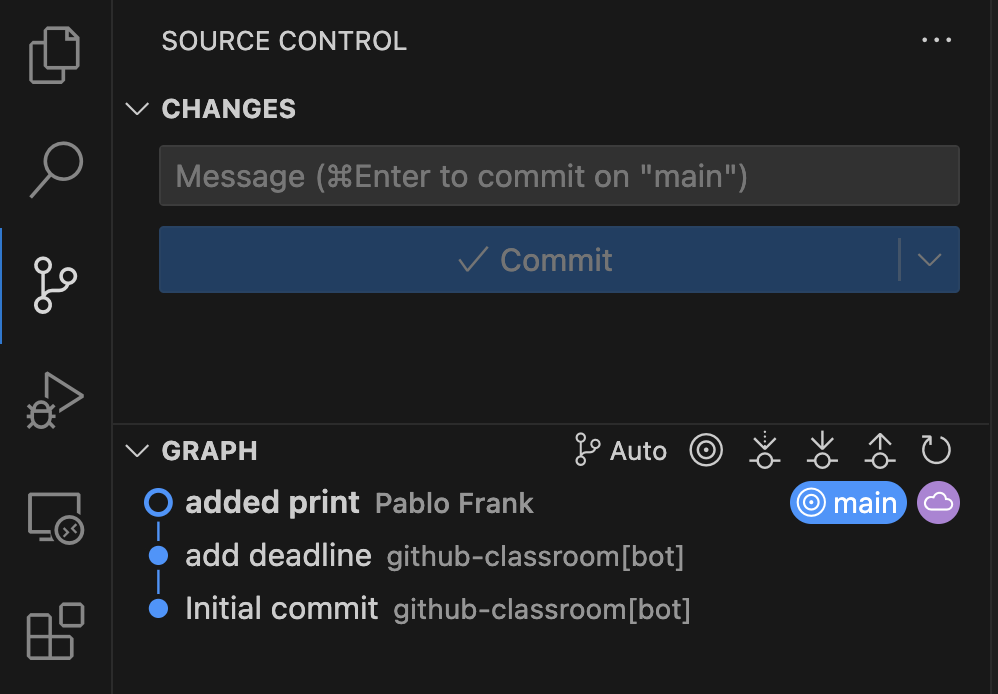
## Pushing (or Uploading to the remote)
Pushing is the way to upload and submit assignments. Once you are ready to do so, run this command:
git push
<br><br>
## Editing in a group
Editing with multiple members can be a complicated task, especially if people forget to commit or upload (push) their changes, or if they forget to update (pull) their local version with every other person's changes. So every time you work on your code, you should do the following:
1. Always **pull** before making any changes. You can also **fetch** the changes, which allows you to see changes without actually altering your local version (but you need to eventually pull)
2. After you make a change (added one function, one test, or one block of code) **commit** your change with a short informative comment
3. After you do a few changes that you tested and they work, **pull** again (just to make sure nobody pushed crucial changes right before you are pushing).
4. If no changes affect your own changes, **push** all your commits (commit and sync)
5. go to (1)
<!--
How do these steps look in VSCode:
1. Go the Source Control section of VSCode<br>
{: width="80%"}
2. You can fetch any changes (without pulling)<br>
{: width="80%"}
3. You then pull any changes<br>
{: width="80%"}
4. You then Edit the file and stage the changes<br>
{: width="80%"}
5. You then commit any staged changes<br>
{: width="80%"}
6. You can see the committed (but not yet pushed changes)<br>
{: width="80%"}
7. You then pull any changes (last minute modifications might be important)<br>
{: width="80%"}
8. After you have edited and committed then push any changes<br>
{: width="80%"}
9. After you have pushed, the graph should have all changes<br>
{: width="80%"}
-->
## Troubleshooting
When you push, there are errors indicating there is a conflict: this usually happens if someone else made changes that you did not pull. It can also happen if you made changes through more than one codespace tab or if you disconnected between making a change and committing and pushing.
The way to resolve this is to resolve the conflicts. Before resolving any conflicts, it is a good idea to save a copy of the edited file (in case something is lost) and then perform a merge.
You would run the following instructions, in the terminal (inside the top directory of the repo), one by one **without the comments**:
Configure pull to merge as default strategy:
git config pull.rebase false
After this, it is possible to pull and then push as normal. You can do this on the terminal:

Pull previous changes and merge with your own
git pull
After this instruction, a window will ope in the editor with a bunch of commented out text. This is where you manually insert a commit message for your action resolving the conflicts.

You only need to add a line above the text indicating the commit message. For example: `Resolving commit conflicts`, and then click on the check mark that accepts the message (top right of the editor window).


Push your own commits to the remote
git push
```